Published July 18, 2026 · Reviewed by the Unbiased Advice & Insights editorial team · How we research and score
A food processor is a versatile kitchen tool that can chop, slice, shred, puree, and even knead dough. But if you are new to using one, the array of discs and buttons can be intimidating. This guide walks you through common tasks step by step, along with safety tips and cleaning advice to help you get the most from your machine. Our editorial team compared specifications, buyer feedback and key decision factors to compile these instructions.
Getting Started: Parts and Setup
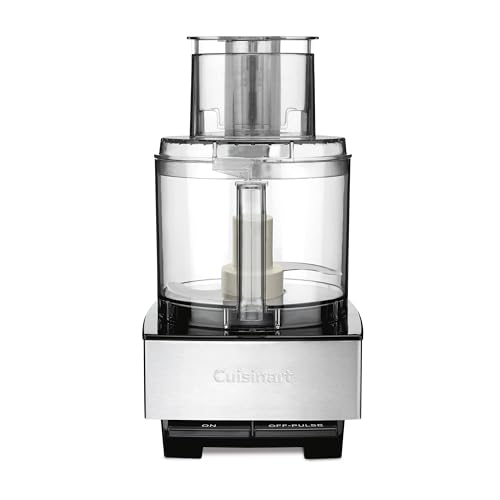
Before you begin, familiarize yourself with the main parts: the motor base, the work bowl, the lid with feed tube, the pusher, and the blade/discs. Most food processors come with an S-shaped chopping blade (also called a metal blade) and a set of slicing and shredding discs. Always ensure the unit is unplugged when assembling or changing parts. Place the bowl on the base and twist to lock. Insert the blade or disc over the central spindle. Place the lid on and align the tabs, then lock it. Plug in only when ready to use. Some models have a safety interlock that prevents operation if the bowl or lid is not properly secured. Check that the bowl sits flat on the base and the lid clicks into place. The feed tube is often wide enough to accommodate whole tomatoes or onions, but you may need to halve larger items. The pusher helps guide food safely down the tube. Keep the pusher handy; never use fingers or utensils to push food.
How to Chop Vegetables and Nuts
Chopping is the most common task. Use the metal chopping blade. Cut ingredients into uniform 1-inch pieces for even results. Do not overfill; fill the bowl no more than half full. Pulse in short bursts (1-2 seconds each) rather than running continuously. For coarse chop, pulse 3-4 times. For fine chop, pulse 6-8 times. Check consistency and scrape down sides with a spatula if needed. For nuts, pulse gently to avoid turning them into butter. Stop when you reach the desired texture. For example, for salsa, pulse tomatoes, onions, and cilantro together until chunky. For pesto, process basil, garlic, pine nuts, and oil until a coarse paste forms. For breadcrumbs, use stale bread and pulse until fine. Always use the pulse function for control; continuous running can turn vegetables into mush. If you need a large quantity, work in batches. After chopping, remove the blade before emptying the bowl to avoid cuts.
Slicing and Shredding with Discs
Replace the chopping blade with a slicing or shredding disc. These discs sit on the spindle and have a flat surface with cutting edges. For slicing, use the slicing disc (often reversible with thin and thick sides). For shredding, use the shredding disc (with small holes for fine or large holes for coarse). Place the disc onto the spindle, then lock the lid. Feed ingredients through the feed tube using the pusher. Apply gentle, even pressure. For round foods like carrots, cut them to fit the tube. Do not force; let the disc do the work. Always use the pusher, never your fingers. For consistent slices, pack the feed tube firmly but not too tight. For example, for coleslaw, shred cabbage and carrots using the large shredding disc. For potato gratin, slice potatoes with the thick slicing disc. For cheese, shred blocks of cheddar or mozzarella using the shredding disc. Soft cheeses like brie may not shred well; chill them first. After use, remove the disc carefully as the edges are sharp.
Pureeing Soups and Sauces
For smooth purees, use the metal chopping blade. Ensure ingredients are soft (cooked or canned). Add liquid as needed to help the blade move. Start on low speed, then increase to high. Process continuously for 30-60 seconds, scraping sides halfway. For very smooth results, let it run longer. Be careful with hot liquids: let them cool to room temperature first to avoid pressure buildup and leaks. If you need to puree hot soup, use an immersion blender instead. For hummus, process chickpeas, tahini, lemon juice, and garlic until creamy, adding water or oil to reach desired consistency. For baby food, steam vegetables until tender, then puree with a little cooking water. For nut butters, process roasted nuts for several minutes, scraping down often, until smooth. The processor can handle small batches; for large quantities, consider a blender. Always ensure the lid is tightly locked before starting to prevent splatters.
Making Dough for Bread and Pastry
Many food processors can knead dough, but not all. Check your manual for maximum capacity. Use the metal blade (some models have a plastic dough blade). For pastry dough, pulse cold butter and flour until pea-sized, then add ice water and pulse until just combined. For bread dough, add dry ingredients first, then liquid through the feed tube while pulsing. Process until the dough forms a ball. Do not overprocess; it can overheat and develop too much gluten. Let the dough rest before shaping. Typical dough capacity is about 2-4 cups of flour. For pizza dough, combine flour, yeast, salt, and olive oil, then add warm water gradually. For pie crust, use very cold butter and minimal water. The dough should come together but not be sticky. If it is too dry, add water a teaspoon at a time. If too wet, add flour. After kneading, remove the dough and shape it by hand. The processor does not replace traditional kneading for delicate doughs like brioche, but it works well for sturdy doughs.
Safety Tips for Beginners
Always unplug before assembling, disassembling, or cleaning. Never put your fingers near the blades or discs; use the pusher. Do not overfill the bowl (max fill line is usually marked). Avoid processing very hot liquids; let them cool. Keep hands and utensils away from moving parts. Use the pulse function for better control. If the machine stalls, turn it off, unplug, and remove some contents. Always lock the lid before starting. Check that the bowl is securely locked on the base. Do not operate the processor empty; it can damage the motor. Keep the cord away from counter edges to prevent pulling. If the unit vibrates excessively, stop and check that the bowl is centered. Never immerse the motor base in water. For added stability, place the processor on a non-slip surface. Supervise children if they are nearby; the blades are extremely sharp.
Cleaning and Maintenance
Most bowls, lids, pushers, blades, and discs are dishwasher safe (top rack). However, hand washing with warm soapy water is gentler and preserves sharpness. Rinse immediately after use to prevent food from drying. Dry thoroughly before storing. The motor base should only be wiped with a damp cloth; never submerge. Store blades and discs carefully to avoid dulling. Check the gasket periodically for wear and replace if cracked. Keep the feed tube cover clean to ensure proper locking. For stubborn residues, soak parts in warm soapy water before washing. Use a brush to clean the disc slots. Avoid abrasive sponges on plastic parts. After washing, air dry completely to prevent mold. Store the processor with the bowl and lid loosely attached to allow airflow. If the blade becomes dull, it may need replacement; check with the manufacturer. Regular maintenance extends the life of your food processor.
Common Mistakes and How to Avoid Them
Beginners often make a few common mistakes. Overfilling the bowl is the top error; it leads to uneven processing and leaks. Always stay below the max fill line. Another mistake is using the wrong blade or disc for the task. For example, using the chopping blade for slicing will not work. Always match the disc to the desired cut. Not locking the lid properly is another safety hazard; always listen for the click. Processing hot liquids can cause the lid to blow off; always cool liquids first. Forgetting to scrape down the sides during pureeing results in a chunky texture; pause and scrape as needed. Using too much pressure when feeding food through the tube can cause uneven slices; apply gentle, steady pressure. Finally, neglecting to clean the gasket can lead to leaks and odors; remove and wash it regularly. By avoiding these pitfalls, you will achieve better results and enjoy your food processor more.
More guides
See our full buying guides hub and our research and scoring methodology. We compared specifications and verified owner feedback; we did not physically test every product.